
We’ll be headed to Disney World soon to celebrate my mile-stone birthday and that means that I’m in the process of planning all my outfits!
Our first evening at Disney is my actual birthday and we will be at Epcot for the Air Supply concert!
The Parks
If you’re like me, you dress according to the Park and the weather.
For Magic Kingdom and Hollywood Studios, I dress more casual – usually in something like, nice shorts & a cute top or bike shorts under a sporty little dress – because we’ll be getting on and off roller coasters.
For Animal Kingdom, I wear the coolest dress I have because it’s always about 10 degrees hotter there than at the other parks.
When we go to Epcot, I always like to take the opportunity to dress a little nicer because we are not riding rides, we are browsing the “countries” and visiting restaurants.
And, since our first evening in the parks also happens to be my birthday, I definitely want to wear something pretty!
What to wear
With that in mind, I decided to wear my favorite navy blue dress on our first evening.
I think it would be called a Trapeze style dress. It has a key hole back opening, lace on the shoulders and is about knee length.
It’s a very pretty dress and very forgiving of my lumps. Lol
Once I decided on the dress, I started thinking about nails and accessories.
Accessories
Earrings
I’ve had my eye on these earrings for probably a year, maybe longer.
Everytime I would get brave enough to buy them, they would be out of stock.
But, now that I had decided on my navy blue dress, I thought of the Orange Bird Earrings and finally catch them available!
So, I finally ordered them!

https://www.etsy.com/listing/829977998/orange-bird-3d-inspired-studs-earrings
(I was also looking for earrings to wear with my Socerer Mickey costume, so I ordered a set of Socerer Mickey Hat earrings AND a set Jacques and Gus Gus because I just couldn’t resist!!)


Handbag
With the earrings on the way, I started again looking for an Orange Bird handbag but every time I saw one that I liked, it was out of stock.
An Orange shaped handbag came up in my Google searches. It was relatively inexpensive, cute and had pretty good reviews.

https://www.amazon.com/gp/aw/d/B06Y3FS7WP?psc=1&ref=ppx_pop_mob_b_asin_title
So, I ordered it, thinking an Orange shaped handbag along with the Orange Bird earrings would work!
But I kept searching
While I was searching, I came across the As the Bunny Hops blog and an Orange Bird Handbag caught my eye.
It turned out that the blogger had used the same handbag that I had just purchased and had applied vinyl to turn it into an Orange Bird handbag…
Make Your Own Orange Bird Purse
I do not have a vinyl cutter and I don’t know anything about applying vinyl but I thought about it and after some thought, I decided to paint Orange Bird and make my own adorable Orange Bird inspired handbag that way!
I did some reading about painting on leather and decided it was best to purchase a leather painting kit.
I chose the Smalltongue 14 Colors Acrylic Leather Paint Kit.
It had mostly good reviews and comes with a primer called Leather Preparer and deglazer and a sealer called Acrylic Finisher.

https://www.amazon.com/gp/aw/d/B08NTJ8XNW?psc=1&ref=ppx_pop_mob_b_asin_title

As a precaution, I bought a little leather change purse so I could practice on the change purse before taking a chance on the orange.
The change purse is approximately 4×4 and I bought it on Amazon.

Making an Orange Bird change purse
Time to start!

This may not be the easiest way to do this but it’s the way I know…
I painted both items with the deglazer and while they dried I made a screenshot of the Orange Bird template from As the Bunny Hops and put it in the Canva App to flip it and size it.
Once I had the correct sizes and the face “looking in” the right direction I printed both sizes as closely as my printer allows.
Then I cut them out in a cirle shape.
First, I traced the lines with a small point sharpie so I could see the image on both sides. Then, I traced the image with a soft pencil (Stabilo All 8008) and transferred the template onto the change purse using a hot knife shading point. (I use a Walnut Hollow Brand hot knife that I bought at Michael’s Craft Store a few years ago )
For the change purse, I also drew on the leaves that are on top of Orangie’s head.
Once the image was transferred


Next, I painted the whites of the eyes and left them to dry.
While I waited, I painted the the beak until I was happy it with it. I started with yellow and added some orange for shading.
I painted the inside of the mouth with a mixture of red and purple and then added a little more red for his tongue.


Once the front was dry enough to lay it face down on the table, I painted Orangie’s butt feathers. Lol
That was my husband’s idea and I loved it!

I’ll wait a couple days to make sure it is good and dry before I put the Acrylic Finish on it.
Well… my practice change purse came out great, so …
Time to paint the handbag!
I painted the handbag using the exact same method as the change purse.

I do need to note that the leather paints worked best on the real leather change purse. They just went on much easier and smoother.
Whereas, it was much more difficult to get the drawing transferred and smoothly painted on the pu-leather.
Pu-leather is leather with a veneer over it and I guess it’s the veneer that makes it so difficult to paint.
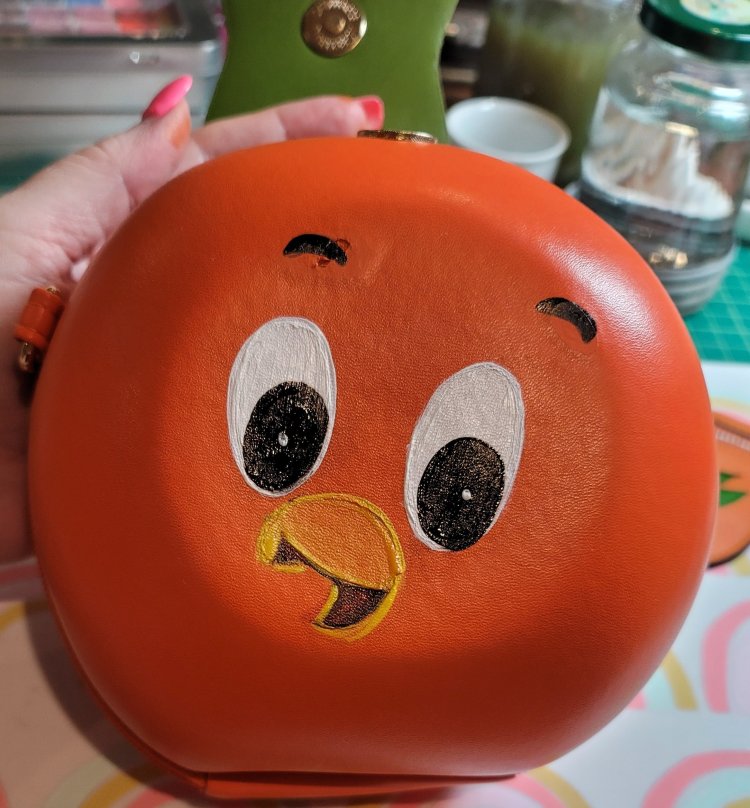
Oh! And by the way, be very careful not to melt your pu-leather!
I actually melted both of Orange Bird eye brows but happily, I was able to fix it by painting over the burns with orange paint.

As you can see, it is possible to paint the pu-leather and it comes out lovely but it definitely needed more patience!
I let both bags dry for 2 days, as a precaution, and then painted on the Acrylic Finisher.
I was very afraid that the paints would run as sometimes happens when you paint a finish over acrylic paint but there was no problem at all!
I’ve had such a fun time with these and they are just SO cute!
I hope you try out one of the purses and let me know in the comments!